Showing posts with label diaper cover. Show all posts

Sunday, October 7, 2012

Online Free Downloads

* If you are new to my diaper-sewing blog, please start HERE.  My pattern templates were not designed to be used with rolled/zig-zagged elastic or the tack&turn cased elastic method.

I now have a YouTube channel as well: ArfyMakes YouTube channel
I do live-streaming on Wednesdays at 2pm Pacific time, and you can make requests for what I'll sew, or I can help you trouble-shoot your own projects.

My diaper pattern templates are all on google docs.
DO NOT allow your print settings to "scale to fit!"
If there is an option of choosing a printed scale percentage, then just type 100%.

I have also posted Projector-friendly PDFs for download as well.

Templates : Blog Posts and/or Video tutorials showing them sewn-up


One-Size PUL-outer Diapers (Pockets, AI2s, AIOs)


Newborn PUL-outer Diapers (Pockets, AI2s, AIOs)


Universal NB Squaretab (approx. 6-11lbs)


Sized PUL-outer Diapers (Pockets, AI2s, AIOs)

Sized Squaretab Diaper Templates  X-SmallSmallMediumLargeX-Large :  pocket AIO pictorial


Fitted Diapers + (require a moisture-barrier cover)


M-L Fitted : (14-30lbs) post

NB/S Fitted : (6-14lbs depending on materials used) post, VIDEO

NB/S Serged Fitted : (6-14lbs depending on materials used) pictorial, VIDEO


PUL Diaper Covers


XL FOE Cover (requested)

NB/S FOE Cover : originalupdated (+now w/ guides for double gussets by request)


Miscellaneous

Tuesday, August 23, 2011

Upcycled Wool Shorties

This is a pair of cashmere+wool blend shorties using a slight variation on the Katrina Longies/Shorties pattern (I dip my front further and narrow the hips to fit my kids best).

You'll need:
- wool or cashmere sweater (at least 80%)
- 100% polyester thread (you can zigzag with a normal sewing machine or use a serger)
- safety pins

Trace your pattern page onto your sweater and then flip over so you have two mirror image pieces.
I also serged up the bottoms in preparation for when I finish off the legs, but this is purely optional.
Cut the waistband piece from either a complimenting color sweater or the same sweater.
For longies, I sew the legs first. For shorties, I sew the body/trunk first.
Pin along where you will be sewing.
Sew or serge up the edges. Leave the leg sections unsewn.
Shift the seams to the middle at the front and back and pin.
Sew or serge around the leg to crotch to leg.
Fold up and hem the leg cuffs with a zig-zag stitch for shorties or you can just use a straight stitch for longies.
Turn right-side-out.
Sew or serge up one side of the waistband piece.
Fold and pin to the outside of the waistband (lining up the seam with the back seam on the body piece).
Zig zag or serge around while stretching just the waistband piece appropriately as you go to match up with the body piece.
Fold up the waistband and you have your shorties!
Wash and lanolize and they're ready to wear over a fitted diaper, prefold, or flat! :)

These are a size Large on my 28lb 36" tall daughter Sara (She is between a M and L):
When I make fleece versions I make the waistband about twice as wide. I do the same thing for newborn size to make them more adjustable. Fold over the wider waistband to sit below the cord, and fold up to fit better and a little longer. :)

Sunday, August 7, 2011

Upcycled Wool Wrap

Finished during nap time today...

This tutorial is a little more general than the last and uses many of the same sewing techniques like elastic casing and serged edges.

First find some 80-100% wool, lambswool, or cashmere sweaters at your local thrift store. L-XL preferred. Then wash on hot with a little detergent, and dry on med-high to felt it up really nicely.

For this example, I just used my general prefitted shape (before you cut off the wing extension rectangles and before you add any elastic). I then added 1.5" to all edges to allow for the cover's elastic casings and the seam allowances at the wings/hips.

This assures that the wrap will fit over the fitted at the highest rise. You can add a little more at the top and bottom (front and back when on) if you'll be using it over a very stuffed fitted for overnights etc. or want a wide waistband.

You'll need 100% polyester thread (to prevent wicking) and polyester braided elastic.

Cut out your wool from the chest or back panel of your sweater (unless you found one with very big arms or are making newborns or small wraps).

(optional) Cut out an extra layer for the wet-zone and serge around those edges or just zigzag onto the wetsone area of your wrap fabric. Make sure it is narrow enough to allow for 1.5" outside all sides (for the elastic casing).

Fold over and seam down your leg opening elastic casings. Make sure they are at least 3/8" wide.

Fold and seam your back and front casings as well. I leave a little wider at the back and use wider elastic across the top of the back as well. Here is where I also make sure that my wings and front panel sides end up the same width. You can fold the top casing more or less in the front and back to account for any difference you might have here.
The view from the outer side:
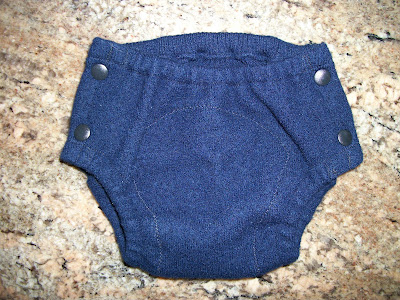
Thread through (with a safety pin) and tack your leg elastics about 1.5" from the outer edges. I used 1/4" in the legs here.

Thread through and tack your front and back elastic.

Fold over and seam in about 1/2" at the 4 unfinished sides.

Add snaps.

And you're done! Now they just need to be lanolized.
Instructions at: http://woollybottoms.com/faqs.php#Q3