Yes, I WILL do specific tutorials/pictorials by request. :) Feel free to request any time!
So... firstly, you can do fitted assembly in several ways. Sewn-in petal soakers, wet-zone soakers, snap-in soakers, trifolded thin soakers. LOTS of options. Below is a photo of both my NB snap-in pieces and my inner absorbent fabric + wet-zone soaker layering pieces.
For this tutorial, I will be doing the wet-zone soaker. I start by just zig-zagging my soaker in-place on my inner fabric layer.
Then I serge around the outside of all but the front/top of all my layers.
It ends up just like my turned & top-stitched diapers with the opening at the front.
Inside showing the wet-zone soaker.
Next I sew my elastic casing channels. The back elastic...
Then the leg elastic.
The outside showing the elastic casings.
Inside showing elastic casings
I use a bodkin to thread my elastic and tack it into place, but I used to use a safety pin.
Stretch to desired tension and tack the other end. Then trim.
This is how I hold the leg elastic tight before tacking the second side.
Now all your elastic is installed.
All that is left is serging closed the front opening and adding the final few snaps.
Serge across the opening starting about an inch back.
It will look like this:
I then use a yarn needle to thread through my serge tails.
Then you just trim off the little bit that is sticking out. :)
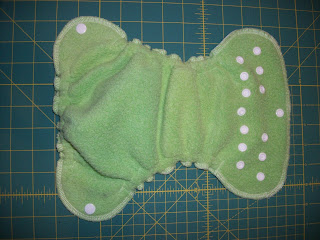
Add your top umbilical snap and your wing snaps, and you're done!
Here is the inside showing the wet-zone sewn-in soaker pad seam lines.
Templates can be downloaded here: http://prefold2fitted.blogspot.com/2012/10/online-free-downloads.html


Thank you for this, what type of elastic do you use and what is the width of it? Do you pre cut the elastic before threading. :)
ReplyDeleteI almost always use 3/8" Stretchrite polybraid elastic. I do not pre-measure or pre-cut. I do elastics by feel. :)
DeleteThank you, I just wondered if you have a template of the soaker you used for this and the contour one you use in the nb/s t&t?
ReplyDeleteJust digitized them for you. :) https://docs.google.com/file/d/0B3ZS8fH9BssYVDVxZF9XanVnVUU/edit?usp=sharing
Deleteand
https://docs.google.com/file/d/0B3ZS8fH9BssYekRsb3FNcHNGckU/edit?usp=sharing
Your amazing, thank you for doing that :)
Deletei love this would you be able to show how you actually thread through your elastic??
ReplyDeleteI have shown that technique in several previous tutorial posts. There isn't much to see on the outside. It *might* be more obvious with a video tutorial, however, I don't have the ability to do those.
DeleteEven way back here.... http://prefold2fitted.blogspot.com/2011/08/basic-serged-prefitteds.html
DeleteWhat do you think is the weight range of this diaper? :)
ReplyDeleteI'd guess 6-12lbs depending on build and materials used.
DeleteI tried to view the pdfs but they dont open for me??
ReplyDeletecan you make this without snaps and use a snappi to hold it closed?
ReplyDeleteFor sure. As long as your outer fabric is a snappiable fabric. :)
Deletethanks. I want to make this for out new baby but now the types of fabric are what im trying to figure out too...
DeleteWould it be possible to make this with a snap instead of sewn in soaker?
ReplyDeleteRead the first sentence in the tutorial. ;)
DeleteWhat type of thread do you use?
ReplyDeleteWhat kind of fabrics did you use for this, and how did you layer them?
ReplyDeleteFor this one, the outer is cotton sherpa, and the other layers are regular weight bamboo cotton fleece. The layering is shown. :)
DeleteThank you��
DeleteThis comment has been removed by the author.
ReplyDeleteCould you do this with an overclock stitch? I can't afford a Serger yet and I am getting frustrated with T&T diapers.
ReplyDeleteCould you do this with an overclock stitch? I can't afford a Serger yet and I am getting frustrated with T&T diapers all the time.
ReplyDelete