Friday, May 24, 2013

Cloth Baby Wipes

When my kids were babies, I just used plain baby washcloths.  You know, those thin little single-sided cotton terry ones that you can find at discount stores (my favorite is Ross) for <$5 for a 24-pack.  I still wait until I see a pack on clearance for $1.99-$2.99 and grab them for upcycling, gifting, and donations.  However, I know many people like thicker and more attractive cloth wipes.  Sooooo, this is how I make them now for cloth diaper cakes and diaper gifting.

One side baby terry (either those same pre-made baby washcloths or the fabric).  I have some REALLY soft bamboo baby terry that I got as seconds that would be so squishy and soft for these as well.  They're about an 8-inch square with rounded out corners.
 One side cute soft flannel.  I pre-wash/pre-shrink both fabrics before sewing.


Installing Cased Elastic

This is the method I use for installing elastic in MOST of my patterns.  Occasionally I zig-zag into the seam allowance and then turn, however, I really only use that for doll diapers and keychain diapers.  The things where it'll be too tight to get my/your hand in there to retrieve the bodkin or pin or to cut the elastic lengths after installing.

My mother taught me this method of installing elastic when I was a kid and we were making hair scrunchies.

First you sew your casing channels (after turning for T&T diapers).  I usually use 3/8" polybraid elastic, and sew my casings just a tad under 1/2" wide.  I don't measure, but instead have it gauged off my presser foot's edge.
 You can use a bodkin:
Or a safety pin:
 
Feed your elastic in through your turning hole in T&T diapers and your front opening in serged.
 Guide it to the entry to your casings.
 Feed it through your casing channel all the way to just past the end.
 Then set your stitch a little smaller and sew back and forth a few times to tack down the end securely about 1/2" in from the end of your elastic (or just inset from your bodkin or safety pin.)
 The secured first side:
 Then detach the bodkin or safety pin from the elastic and remove it through your opening (don't leave them inside the diapers folks...).  ;)
 Now you're ready to stretch your elastic to your desired tension.
 Stretch to where you want it and then use a safety pin to secure the elastic in-place about 1/2" from the end of your casings.
 Sew back and forth again to secure your elastic in-place and remove your pin.
 Now cut off your elastic leaving a little bit after the seam lines to keep it secure.

Do that for the sides and back elastic and then just close up the front opening.  That is it.  :)

Saturday, May 18, 2013

Modified NB-S FOE covers

I now have a VIDEO tutorial online for FOE covers.

I arched down the top and raised the sides a little on my NB-S FOE pattern and used loop fabric instead of loop tape across the top...  and the snap-on/off tabs too of course.  :)  I still added laundry tabs (so you can choose to keep the tabs snapped on too if you want).


Diaper Cake Drawing Winner #1

The baby shower for the first drawing winner is tomorrow.  She will be picking up her diaper cake this morning.  I didn't take any detail pics, but I hope she sends some action shots once the baby is born!


There are 2 premium, 3 regular, 5 infant, and 7 preemie prefolds from cottonbabies.com.  The topper is cloth wipes.  Then around each tier are OS diapers on the bottom (2 AI2s, 2 OS pockets, 1 OS fold-in fitted, and 2 OS PUL covers), and NB-S on the higher tiers (1 FI2, 1 fleece cover, 1 bamboo fitted, 2 prefitteds, 2 PUL covers, and 2 pocket diapers).  Then there are 3 sets of pins, 2 snappies, and a detergent sample (also from cottonbabies.com).

Have a good shower tomorrow mamaofemmalyn!

Sunday, May 5, 2013

Petite OS Fitted Diaper

This is the same shape as the snap-in fitted soaker from the previous post.  I just elongated the wings and widened the front panel.  So...  it still slides into the snap-in cover pockets, but it also serves as a stand-alone fitted diaper.


Templates can be downloaded here:  http://prefold2fitted.blogspot.com/2012/10/online-free-downloads.html

Wednesday, May 1, 2013

Snap-In Cover and Multi-Style AI2

This is my first response to this thread on the Cloth Diapering board on babycenter.com.

Cover/Shell assembly process:


Then you just follow the same sewing methods used in the Flip-style cover tutorial.

The fitted soaker is just assembled like a serged fitted diaper with cased elastic.  The snaps go on at the very end since they go all the way through.

(I'll add a simple pictorial for the insert sleeve.)

The first request was for an Aplix version.  
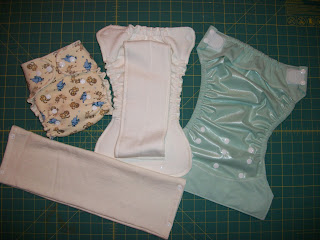
The wipeable cover can be used over any fitted, prefold, or flat...  Or, it can snap together with either the insert/stuffable sleeve or the fitted soaker.  Below are made with just bamboo fleeces.
 
Snap-in fitted soaker (easy to make them PUL-backed or stay-dry topped): 


Snapped into the cover/shell.


Large setting.
Snap down both the soaker and the shell to change rises/sizes.
Small setting with the fitted soaker.
Insert sleeve will fit my biggest OS insert (newer BG 4.0 insert).
You could also PUL-back the insert sleeve or make it out of stay-dry fabric.

To change the rise just snap down or fold the insert.  The sleeve will collapse easily.

Smallest rise with insert and insert sleeve (and bamboo doubler in this case).
This is the cover stuffed with only the bamboo fleece sleeve/doubler.

You could make the sleeve with just flannel for a trimmer natural fiber sleeve for inserts as well.